

"Square? You're Kidding!!"
Frame on Border.
Dig through that Mr Rodent!!
SO! You're Gunna Build a Finch Aviary Then?
Now I can already hear the skeptics pointing out that this is from the person who confessed to having "zero building skills" so I might suggest that you building purists out there skip this bit and go and have a lie down or flip ahead and read something else!
Yes, just when you thought it was safe to erect a bird-type structure I am
about to throw in my 5cents worth! Rubbish I hear you say! Well, actually you
are probably closer to the mark than you dare even think!
Sadly to many I am a great proponent of the 'reuse, recycle' school of thought
and each aviary reflects this in its external appearance. Never let it be said
that I have turfed out any building materials that might possible be useful for
an aviary at "sometime". Industrial rubbish collection nights hold a completely
different meaning for me as "one man's rubbish is another man's new aviary
complex'!
So here for your avicultural delectation is a guide to building an aviary from
"scratch" - and I do mean scratch!!
|
|
|
|
|
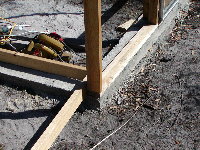
"Square? You're Kidding!!" |
Frame on Border. |
Dig through that Mr Rodent!! |
Dig One Large Trench:
The most important step after the initial planning stage is to contemplate
your 'first line of defense' in the war against burrowing-type-nasty-small-furry
rodents.
However, I am want to digress even this early in proceedings! Don't let the
planning of your aviary become too weighty a chore and leave you protractor and
compass stuck in the wall holding all those reminder notes in place!
I tend towards the 'have a basic idea and let it nurture school of thought'
which basically means decide upon the size and the geographical location but
keep an open mind as to what the final result will look like. Nothing like
having a design set in concrete when some smart, albeit well-meaning, fincho
says something profound which usually starts with "say, what if you did.......or if
you turned this that way......what if they got......." And usually ends up with you
destroying your valued plans or attempting to design a new hothouse instead!!
So be flexible - right then, back to work!
Now before I get too carried away where I live is composed of sand and any rocks
that reside there I put there so please don't take offence at the next stage we
call Moat digging!!
Draw out the floor plan of your aviary on the ground, insert pegs at various
crucial spots around it and, if you can beg a favour, borrow a dumpy level to
check the height of your structure lest you end up with a "slight rise" from one
end to the other! The "rollercoaster effect"!
Too easy! Now comes the fun bit, dig down at least 30cms all around your
structure and make it at least 10cms wide. In an aviary 9m by 6m you do the
sums!!
Here it might be prudent to advise you to lock up your dog as canines find the
game of "humans on all fours digging" irresistible. Just imagine your delight to
find that while you have been strenuously digging and clearing the trench to
find your dog has been doing likewise - in a spot nowhere near your trench but
still at the same time, doing its level best to refill your trench! Wagging tail
or not it has to go!
To explain why a trench is necessary this aviary is intended to make use of the
natural terrain and will not have a complete concrete floor so it needs a pretty
impressive 'moat' to prevent rodents raising their ugly heads inside!
Once you have cleared the material from your trench with your nifty trenching
shovel (borrowed!) collect every glass bottle, broken window, rusty nail and
rubbish wire (all free!!) lying about and proceed to smash contents into bottom
of trench. This is excellent therapy after a hard day at work.
Add boxing (again anything you can scavenge) for aviary base and then fill
trench with cement which is usually backbreaking work! Thinking of lashing out
and buying some reinforcing metal for your concrete? Never! Find any old pieces
of metal, bike frames, gun barrels and the likes and use them instead, once
again free!
Suggest you do not try the bright idea of "hey, why don't I buy a few beers and
invite the lads around - glass in trench and concreting labour for beer". This
is a VERY DUMB idea for aviaries requiring a large amount of concrete as
the two activities - beer drinking and concreting - are mutually exclusive and
NOT to be contemplated together unless you have a death wish! Or you wish
to watch your work force dwindle as the day goes on!
This 'concrete moat' is to deter even the most determined rodent from
entering your aviary complex from underground and worth every aching muscle in
the long run. I have seen and heard of people that bend the bird wire at 90
degrees away from the aviary and bury it using the proven theory that animals
will try to dig in near the base of the fence/aviary and when they discover the
wire, they, in theory, give up!
Me, I aint gunna settle for anything less than the Siegfried Line and, as I did
say, I'm digging in sand!! Empty bottles are also cheaper than bird wire anyway!
Ever seen what salt/moisture does to wire that's been buried or maybe even ask
yourself how much were you thinking of spending on finches!!
 |
 |
 |
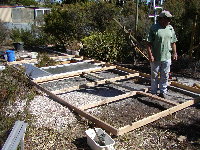
| "I ain't lifting this!!" | "Now What!!!!" | A bit later on! |
To Frame or Not To Frame:
We now have a very spivvy, relatively level concrete frame that we can start
to attach our aviary framework to. As an aside have you ever noticed that dogs
find fresh concrete irresistible to walk through? Just thought I'd share that
with you!!
I tend to work in wood as there is not as much personal danger associated with
timber as with the various metal attaching devices! Well, in my hands at least!
Next question is where to locate the feed/entry/catching area and I tend to
go with the bit that is furthest away from the morning sun so as not to waste
this valuable resource on a tin section! If you live in warm climes this may not
be a major consideration - down here it is!
If our concrete base is level then we can begin to plan the next stage.
How high? Logic tells you around 2.4m is a good height as most building products
come in that size.
Nope, not me as I wanted something bigger this last time so it's 2.8m or bust!
When one takes into account the height of the concrete base AND the frame it is
a tad lofty. Or, as my erstwhile mate pointed out "Bloody high aint it?" and I
must admit standing on the top did give a "panoramic view of the surrounding
countryside"!
Once a sane height has been agreed upon the next trick is to work out the
cladding that you will use and how much wire will be used.
Now if you come from some areas this next section will be irrelevant as the only
thing you need over your 'skeleton' is bird wire, not quite that easy down here!
Other questions that cooler climate residents will have to address are such
weighty matters as: where to place the windows/shutters, how many
windows/shutters to have to create a cooling breeze on rare hot days, what
material to clad rest of walls with?
As this project was a 'lengthy' one I chose to do my side panels in two sections - one that was 5.4m long and another at 4.2m which maximized timber lengths and workability. As a plan I tried to place uprights every metre along the length of the side windows allowing. The only timber I need to purchase were the top and bottom plates and the uprights as all the strengthening beams were scavenged from here and there - an old packing crate, some builders off-cuts and even the walls from an old building or have car will scavenge!! As these timbers will be totally covered there was no need for treated pine so any thicker boxing pine was OK.
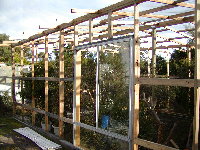
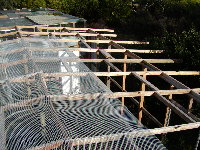
As can be seen from the pictures the top of the panels will have a 1.2m sheet
of wire, then a 0.9m sheet of wire and a "kick plate" round the bottom made of
metal cladding material. The later is to prevent any dogs or other animals from
seeing the aviary inhabitants and I guess it is better if your kid's
soccer/cricket ball makes a resounding clang off this sheet than going straight
though the wire.
Now here is a chance to be mega thrifty with you aviary cladding. Seek out
somebody that wants to take an old roller door to the tip and offer to 'take it
off their hands' as this structure will give you a terrific (free again!!)
length of side panel and they are very strong. Measure and cut with a grinder
and there you have a ready made side wall.
If you know of any building sites they quite often have old 'protector'
sheets of cladding metal laying around which they are only too happy to see gone
(free) and these can be used for external walls - they are all invariably
different colours and sizes but hey, they are free!
Even at a lot of building sites these days they simply smash the lot and are
often only to happy for you to remove treasured bits and pieces - even entire
windows at times! My windows came from a friend who recently had a deck put on
and when I enquired as to what she was doing with the windows (all nicely framed
too!) I was told that the builder had "generously offered" to remove them for
her. Needless to say they now reside in my new aviary!
If not your average salvage lot will be bound to have something to suit the
amateur builder- I use the term 'builder' in its widest possible application!
Before getting too carried away remember to always wash you new bird wire with a
weak solution of vinegar (or well watered down acetic acid!) to ensure that the
zinc coating is removed from galvanized bird wire. From my limited knowledge of
chemistry I believe the white coat that forms after treatment is a compound
called zinc hydroxide and is easily washed off taking the excess nasty zinc with
it.
Zinc poisoning is well documented in parrots but, for the sake of a bit of
vinegar, why take the risk for your finches!
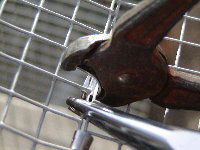
I thought I was being very clever with my wire attaching method using a short
wood screw with a washer until I noticed that every third aviary I visit has a
similar system! It makes tightening wire easy, removing wire easy - for when you
cleverly put it in the wrong place - and for ease of handling. No more bleeding
fingers from trying to removing those damn wire staples!
The actual process of attaching the sheets of wire to each other can be
undertaken in one of two ways. First there is the tried and tested wire tying
method where a strip of wire is wound around every hole in both pieces of wire
and then pulled tight to bring the two pieces together. This takes forever! Also
see notes on 'beer for labour' as previously mentioned and don't even
contemplate it and certainly not if the person has to be around 3m up in the
air!
 |
 |
 |
| Finally with side upright! | J-Clip Pliers. | Only 50m to go!! |
Although this method looks great the same can't be said for your fingers as the constant twisting and threading of wire will open up every crack in your fingers - especially when doing 4 lines of 9 metre lengths of wire. Add to this the effects of the vinegar and you'll have hands like road maps for days!
Yes, I speak from bitter experience and the day I was shown method two- the blessed J-clip - was a red letter day indeed! These clips come in a variety of shapes and sizes from a variety of makers but all do a terrific job of stitching your wire together. For finches I clip every second square so the afore mentioned furry rodents can't get a foot hold! It may take a lot of J-clips but for the lack of wear and tear on the hands they're well worth every cent of the cost!
 |
 |
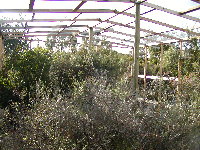 |
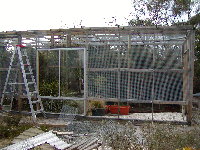
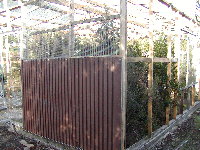
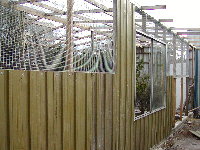
| Back | Side | Natural Foliage |
At this stage we have an empty shell waiting for some refurbishment and, if
you live in warmer climes it's probably ready to have birds in but down here
there is a lot more cladding to go on the entire outside before it's even close
to ready!
As the sun tends to arrive directly through the front of this aviary I have
elected to keep as much in wire as possible in that area and the back has a 1.5m
kick plate around the bottom rather than another row of wire.
However, until I can find some more cladding and can afford some clear and
bronze tint polycarbonate roofing sheets I guess that is it for Building Stage
One!
We'll have to have to look at the floor, the shelter and the placement of
feeders, nesting sites and how best to keep the growing plants alive in an
enclosed aviary!
Catch you soon - I hope!