Mugs Guide To Breeding Crickets.
After having extolled the virtues of a number of finch groups and species
over the past months I though it prudent to present you with a "mug’s guide to
cricket breeding" the sum total of 2 years work and experimentation!
Some have requested the "work’s in progress" shall we say but I wanted to be
sure everything worked well before parting with too much – avoids all those "the
guys an idiot, nothing works as he says" – type comments!! I’m sure you know
what I mean!!
Anyway, read on and call me a nong if you must!!
Why The Cricket?
Well, because it has a large abdomen which you can ‘gut load’ with a range
of nutritious goodies and is readily taken by most insectivorous finches and
softbills. It can be fed at any size depending upon your target species – from
waxbills to weavers. It is very easy to get to reproduce in big numbers with
minimal effort on your behalf.
The fact that they can be grown in any average outside (and I do stress OUTSIDE!!) shed with electricity attached is another huge plus.
So far so good, got you mildly interested yet??
|
|
|
|
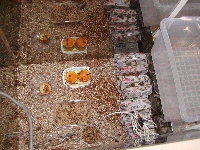
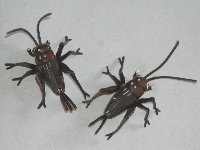
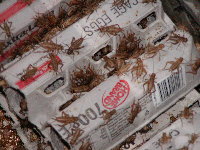
| Fig.1. Male Right, Female Left. | Fig.2. One Or Two Crickets! | Fig.3. The Dreaded Box!! |
History:
Way back in 2004 I was invited by Mick Logan for my first speaking
appearance at the Canberra AFA Conference and it was at this event that I had
the opportunity to listen to a talk by a Canadian, Peter Karstens, who is a
Softbill expert.
After teasing us with a host of Mesia and Pekin Robin shots he went on to show
how he breeds his live food and one of his slides was of his cricket breeding
set-up.
It looked very simple, too simple, and Peter outlined how he bred his which seemed to me to be far too good to be true. Following the conference I emailed Peter and he divulged a few more pearls of wisdom and away I went! Basically he described them as the lazy man’s live food!!
As crickets were, at the time a banned item in Tasmania along with a whole range of other aviary necessities I might add, the first step was to mount a case for the lifting of the ban on them. A few months of work later and this happened but you might like to read how they first instituted their ban. Right in the middle of the breeding season!! For months I had been buying them in to feed my weavers on and had a great little crop in many nests from 1 week old to nearly fully feathered. Ordered my usual 1500 medium crickets to be told they were now banned in Tasmania! Guess every good bird man knows the result, yep, you got it, once the crickets stopped coming every chick went out the nest onto the floor in the fashion of every finches reaction to their favourite food stuff being "withheld’!
Ok, enough of the politics!
Setting Up:
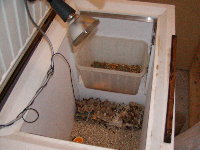
First chore is to find a defunct freezer unit for your initial chamber – not
the small "Tucker Box" style ones but rather the larger types (320 litres plus)
and the bigger the better really. It should have a step shelf inside it if that
helps any – usually where the motor unit sits underneath! As most freezers now
have, by law, to have the lids removed before dumping you might like to offer
your local tip man a "yeasty incentive or three" to stash away one with the lid
intact – worked for me!
Second you’ll need a thermostat with a fairly long probe that you can suspend
near the bottom of the chamber to set your temperature with. This needs to be
wired into/connected to a double flood light-type holder (double in case one
bulb blows and you lose your crickets) and a ceramic one is probably the safer
option. The bulbs I use are either 120 or 150 watt flood-lights.
Beware of cheap thermostats and please, please get a qualified electrician to
wire anything up. The last thing you want is to end up hanging from the rafters
when you open your cricket box or with a ‘melted-down’ interior – as has
happened!!
The light holder is attached to the underside of your freezer lid and the probe
is set to hang around 3-5cms above the floor when the lid is closed.
The floor of my main chamber is covered in a mixture of dry, white beach sand and vermiculite (nurseries have this I’m told but mine came from the Graham Comfort Fund vaults) and should be as dry as possible.
Mine is set for 29 degrees Celsius but you may have to fiddle with yours in
warmer climes to keep it around this level, especially if purchasing an "el
cheapo" thermostat!!
This temperature (29) is apparently the optimal one for cricket culture.
Grab around 6-8 ½ dozen egg cartons (full dozen ones tend to be too large I
find) and arrange them at the base of the raised ledge for the crickets to live
in and hey presto we’re almost there!
If you close the lid completely the build up of humidity will be so bad that
condensation will build up inside and cause serious mould problems. To overcome
this I stick a length of dowel perching under the lid so it cannot close
properly – scientific wot!
However, some of the little "creatures" will escape and may cause a problem!
The Shelf:
Ok, your main chamber is ready to rock so all we need to do now is to get
the "nursery" ready! This is a plastic box from the cheapest outlet possible
with a sealed lid that will sit comfortably on the raised ledge. Into this will
go your "baby blocks" – patience grasshopper all will be revealed!!
One night when the TV’s garbage or your team is copping a flogging grab the lid
of your nursery box and drill a heap of holes into the lid for ventilation – the
more the merrier and small enough so that an adult cricket cannot get in!
That’s it!! Ready to go – but wait, is there something missing?? Sand, egg-cartons, thermostat, floodlights???? Hey, our crickets!!
The Crickets:
Firstly a lesson in sexing crickets – the males have 2 prongs on either side
of their abdomen and the females have these plus a large ovipositor (scientist
for egg laying tube!!) in the middle of their abdomen. Easy!! Even baby females
start to show the ovi……egg laying tube at an early age!
To start with I used 14 crickets as these were all I could buy from the one pet shop with any left alive – 9 females and 5 males. Try to have more females than males if possible.
All you have to do now is feed them and I use Guinea pig/rabbit pellets for their standard diet and avoid watery food stuffs that give off too much humidity. About once a month I also give them a bowl of softfood with a vitamin and mineral mix – there are plenty on the market that are cheap and handy. This gut loads them and is good prior to feeding them out to your birds.
The food is in large coffee lids which can be easily kept clean.
No water is fed to the crickets as this is usually a death trap for baby
crickets and, as per Peter’s instructions, an orange half is placed on a large
lid. This is their only source of moisture and a damn good one as it is full of
Vitamin C!
However, allow the orange to dry out and all your crickets will die – after they
have eaten each other first of course in their search for moisture!!
I warn you about this as it is too easy to forget about your crickets once they
are happily steaming along so always remember to check the oranges!!
Breeding:
Once your brood stock is happily belting about its time to think about the
"propagation of the species"………errrrrrrrrrrrr………..theirs not yours that is!!
Get ye to the florist supply shop and grab a number of Wet Mount Florist blocks
(trust me; they’ll know what you mean!!) Must be wet type not the dry mount
type. The common brand is ‘Oasis’ and this block is around $1.65 and can be cut
into three as per the marks on the actual block.
Take one of these block segments and cut a well into the top with a knife. Then immerse the block in water until it is water logged – you will immediately notice the weight change!
I then grab a large coffee lid and place a wad of paper towelling into it and then place the soaked segment onto it – just in case of any water seepage down the track.
This set-up is then placed onto the floor with the adult crickets and should
remain there for around 4-5 days. However, this will depend upon the number of
crickets you have in your freezer unit – too many and they’ll eat the entire
block within a few days – as someone found out recently!
The female will lay her eggs into the block over that time period. All you have
to do is supply moisture into the well on top of the block ensuring the block
does not dry out and your eggs desiccate.
After around 4-5 days simply put the block into the plastic box on your internal shelf and close the lid (you remember, the one with the holes in it!). Every few days open the lid and add a bit of water into your well to stop the block drying out and if it goes a tad mouldy there is no reason to panic unduly as you can simply cut the offending bits off (but you will lose eggs if you do so!) but I leave well enough alone as, despite the mould, the little crickets will hatch out eventually – in my set-up in around 4-5 weeks. The actual time will vary slightly depending upon the heat generated and the size of your freezer unit. Leave the lid on the box until they hatch.
Suffice it to say the results will astound you!!
|
|
|
| Fig.4. A Metallic Cricket Box. | Fig.5. The Flood Lights. |
Brooder:
Once the little tacker’s hatch (they resemble dandruff in size and number!)
you simply whack a few rabbit pellets into a blender and reduce them to a fine
powder and place in a corner for them to eat. Moisture is taken care of by
placing a slice of orange on a flat lid. Watch the formation of mould at this
stage as the young crickets appear to succumb fairly easily to it so be
scrupulously clean for this stage of development.
If you have a second freezer ready simply take the brooder box and place on its side in your freezer and the babies will start to forage in their new home. If you don’t wish to start a second colony then simply leave the lid off the brooder box and they will gradually integrate into the larger colony.
However, the adult crickets will eat a number of them so beware of this. To try to overcome this I place a sealed ½ dozen egg container into which I have punched a number of holes that will only let the small crickets get in – you can place dry food inside this before you seal it if you like but they still must ‘run the gauntlet’ in order to get to the orange!
There you have it, the easy cricket breeder’s starter kit!
Warning: If you reside in a warm region then the thought of escaping crickets is not one you should entertain. They are very, very loud! Many a time, even in our mild summers, I have scoured the garage with a can of fly spray in hand trying to discover the source of the loud calling that threatens my precious sleep!!
So I strongly suggest you move them way outside or risk possible divorce proceedings!
Oh, and don’t forget to sieve out your cricket set-up at least every 12 months for a small scale freezer and more often for larger colonies.
Finally what eats them? Softbills love them, all species from what I can discover, the larger finches like Weavers, Chaffinches and Song sparrows will tear your arm off to get at them and most insectivorous finches will take the smaller sized guys. Beware of putting them in with Pictorellas. I once tipped around 200 into a bin with a stick leading down into it for the birds to run down and select a victim (as per a friends feeding method) and the Picts simply went in and ate their fill then systematically slaughtered the remaining crickets thus making them unattractive to other finches who preferred their live food a tad more "live"!
Have a go at culturing these guys and if you can come up with a better system or some refinements drop Pete a line at Aviary Life and we’ll make some adjustments.