Livefood for your Finches
The mealworm has long been considered the staple source of live food for a multitude of captive organisms - from other invertebrates right through to mammals. The mealworm or, as it is known in scientific circles, (Tenebrio molitor) is a member of the Coleoptera (beetles) and has three distinct stages in it's life cycle.
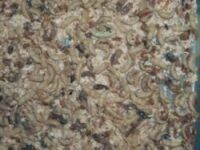
The form that we are most familiar with is the LARVAL stage that we feed to our birds. If you examine the larvae closely you will notice that it has three pairs of legs towards the head end - this tells us that we are looking at a member of the Class Insecta, as all insects have three pairs of jointed legs. Most annelid worms (soil in the garden variety!) have no legs and certainly not jointed ones! The larvae hatch from the eggs and then turn into PUPAE. This stage is where the larvae undergo a huge number of changes and turns into a beetle. During this stage the pupae appears to be dormant and will only move if you pick them up but, in common with cocooned butterflies, the physiological changes happening inside that pupae must be immense. Eventually you will observe the pupae burst open and your adult BEETLE will emerge to continue the propagation of the species. The sexes are identical and each female reputedly lays around 300+ eggs. That, very briefly, is a life history of the mealworm from egg to beetle. But why do we need an entomological dissertation to go about the 'relatively simple' task of breeding mealworms? Damn good question!! If you've found breeding birds to be an exasperating pastime just wait until you go into mealworm production!! THE SETUP: When thinking about this aspect of mealworm culture you need to decide how many mealworms you wish to produce. Regardless of whether you want 10's of thousands or simply hundreds the basic set-up remains the same. THE OLD: In the dim, dark past the mealworm culture consisted of
one or more boxes which contained a huge variety of larvae, pupae and
beetles all mixed in together. More often than not this system was perched
on top of the hot water cylinder! Also you usually had thousands of small
mealworms emerging in the warmer weather and tapering off to very few as
more beetles hatched into the system. The culture contained tonnes of dust,
vegetable skins and shed mealworm skins. People were too scared to throw
away any of this revolting dust for fear that they would also throw their
next seasons eggs away too! And did they ever stop to wonder why the number
of mealworm actually decreased as the number of beetles in the system
increased? Put simply the beetles actually EAT the eggs that they are
tramping about in day after day and when it gets colder and the beetles
start to die off more eggs are actually left in the culture to hatch when
the days warm up. Yes, I was a secret hoarder of bags of mealworm dust in
those 'bad old days'! But no longer! This 'beetle box' is then placed inside another empty plastic box that is 30cms wide x 44cms long x 24cms deep. This then sits upon two coffee lids so that there is a clearance between the two boxes to allow the bran to fall through. The movement of the beetles causes the bran to fall into the bottom box where it is free from the ravages of the adult beetles. Every two days the beetle box is shaken like a sieve and the bran and eggs sieved through into the bottom box. New bran is placed on top to keep the depth around 5cms and off you go again. This is repeated for about two weeks before another empty plastic box is inserted under your beetle box. Your box of sieved bran then goes onto the shelf, is labeled with the date, has a square of hessian placed on top of it and you then wait for about 40 days for the eggs to hatch. During this period you spray your culture everyday with water from some type of atomiser. When you see the tiny mealies you can then place some carrot out for them to nibble upon. This allows you a range of mealworm sizes over an extended period of time. PUPAE: When starting your colony you should place the desired number of mealworms into a container and allow them to naturally pupate. As the pupae appear it is important to remove them into a separate plastic box where they wont be eaten by your veracious larvae. The sedentary pupa is no match for a fast moving mealworm and they like nothing better than a nice meaty feed. After all the humble mealworm is often used to remove the flesh from specimens in forensic laboratories! So as your mealworms turn into pupae out they go on their own. BEETLES: The same is true for the beetles. As soon as they emerge
from their metamorphosis they must be placed into your 'beetle box' before
THEY start to eat those poor, long suffering pupae! The advantage of this
system is twofold: You will get far more mealworms for your beetle dollar
and that stockpile of dust isn't necessary because once you take your
mealworm out you know there are no eggs left in the bran. The size of your
system is also irrelevant as the guide that I have outlined can be applied
on any scale. I started off by using a 'mealworm fridge" (an old fridge with
a light and thermostat replacing the electric motor) to supply my needs then
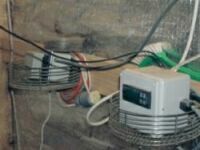
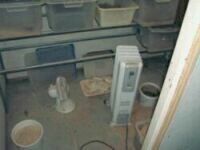
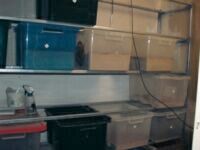
turned the back of my garage into a mealworm room. The attached photos show
you the set-up of this room.
EQUIPMENT: My room is 1.8metres wide, 1.4metres deep and 2.4metres high. Along the back wall are a number of metal tube racks that were constructed to allow the plastic mealworm boxes to fit. I can accommodate30 boxes in this system. On the floor is a cheap fan, which circulates the air 24 hours a day. A column filled oil heated that is connected to a thermostat supplies the heating in the room. This thermostat has a temperature probe that is hung from the ceiling. The thermostat is set for 27 degrees Celsius. The optimal temperature for mealworm growth varies depending upon whom you read or listen to - 27 degrees Celsius works for me. Whereas others say between 24 and 29 degrees Celsius. Much over 30 degrees Celsius and the mealworms will die. A humidifier is connected to a humidistat, which is set for 70% relative humidity. However, I discontinued using the humidifier when the walls began to mould over and drip water!! During drier periods I will turn the humidifier on in the hope of persuading the mealworms to change from larvae into pupae, sometimes it works and sometimes it don't !! The electrics for this system are kept at about 1.2metres from the ground and there is a fluorescent light, which can be turned on when you are in the mealworm room. So, there you have it. A short introduction to setting up a mealworm room. From this system it is possible to supply plenty of small mealworms for the waxbills and still maintain the larger worms for weavers and chaffinches. You will, no doubt, encounter a number of problems when it comes to fine-tuning your system. One of these is maintaining enough beetles to justify the electricity costs involved with running this system. The key to ensuring that mealworms change into pupae and these into beetles are one of life's little mysteries. I have no idea about what factors are required - they appear to change whenever they feel like it!! I have tried humidity, movement, sieving, starving and placing pupae in with the mealworms in case it was a chemical stimulus. Nothing has been an unparalleled success to date. If you have the magical process that guarantees that they will change PLEASE let me know! Also be careful where you buy your bran from as some bags are riddled with a small grey mite which will take over all of your boxes and I would not be game enough to feed these to my birds - to this end not all health food/human grade bran is as clear of this mite as they would have us believe!! A friend of mine ran low on bran and purchased two packets of human grade bran only to lose his culture to these mites. As a last word I was fortunate enough to hear a talk by well-known English aviculturist, Mike Fidler, who suggested that mealworms should be kept in oat bran (whitings he called it) rather than wheat bran. He suggested that wheat bran had the consistency of cardboard and that the oat bran was of far more nutritional benefit to the birds. The unfortunate part of this is that oat bran is around $45 for a 25 kilogram bag. Might I be so bold as to suggest that you try sieving your mealworms for the following weeks feeding and placing them into this oat bran till you feed them out. The best of both worlds! Written by Marcus Pollard - Copyright remains with the author. FOLLOW UP 2005. Recently Peter Karstens the Canadian softbill breeder and livefood guru e-mailed me with this gem which I thought would be of benefit to everybody out there breeding mealies:
I read your recent article on raising
mealworms and you asked at the end if anybody has a trick to get the
mature larvae to pupate.
What works for me is cutting back on moisture
i.e carrots/greens etc. when they have reached full size and more
importantly to place folded pieces of brown paper (grocery bags or animal
feed bags ) on top of the medium. Two or three folded pieces about the
size of the surface to create two pockets will do nicely. The larvae see
this as a good site away from gnawing larvae and pupate en mass. You can
lift up one side of the pocket and look at the pupating larvae and pupae
all gathered up cleanly in-between the sheets. Do not fold the paper
harmonica style or you will dump most of the larvae when you inspect the
inside. Raising the temperature to 29 Celsius should also be beneficial.
Cutting back on moisture gives an alarm signal to better pupate than to to
die of dehydration. Flies and Waxworm will pupate when they run out of
food and turn into smaller adults, but they do complete the cycle . This
is why we see a given species of flies and other insects of different size
in the imago stage.
When I find more than I need for beetles I
sometimes pick up a paper pocket and dump the clean larvae and pupae into
a dish to harvest them as food for my birds . It is quick and efficient
because the larvae are at maximum size and I do not need to disturb the
culture.
Can't thank you enough Peter!! |
 THE NEW: Somebody, somewhere obviously put a lot of thought into
this very problem. They then did a very logical thing and separated the
three stages of the life cycle into different containers. And, lo and behold
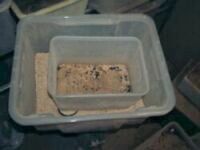
their yields of mealies increased accordingly. The beetles are placed in a
plastic box that is 20cms wide x 30cms long x 16cms deep. Into the bottom of
this container a number of holes are drilled - just large enough to allow
the bran to fall through but small enough to prevent the beetles from
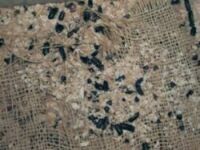
exiting this box. The beetles have about 5cms of bran poured over them. On
top of this bran a square of hessian is placed which is used as a feeding
table for the beetles. My beetles are only fed carrots.
THE NEW: Somebody, somewhere obviously put a lot of thought into
this very problem. They then did a very logical thing and separated the
three stages of the life cycle into different containers. And, lo and behold
their yields of mealies increased accordingly. The beetles are placed in a
plastic box that is 20cms wide x 30cms long x 16cms deep. Into the bottom of
this container a number of holes are drilled - just large enough to allow
the bran to fall through but small enough to prevent the beetles from
exiting this box. The beetles have about 5cms of bran poured over them. On
top of this bran a square of hessian is placed which is used as a feeding
table for the beetles. My beetles are only fed carrots.