So You’re Going to Breed Finches Then!!
The Nesting Receptacle.
Marcus Pollard
The aviary is set, the trees are all in pristine mint condition, the perches are clean and the birds are all through their quarantine period and hanging out to be released but wait, something is missing, oh heck, where are they going to nest!!
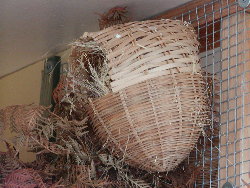
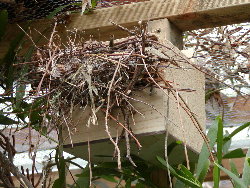
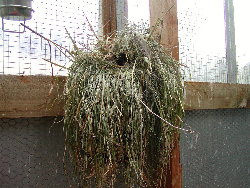
I guess when man first stepped down from the ancestral tree and began to walk upright upon the plains of Africa he dreamt of keeping the Violet-eared waxbill in captivity, no? Oh well, this is my story and I’m sticking to it!! He would have observed them flitting through the desert brush and probably had himself a few waxbill kebabs from a convenient thorn bush thicket nest. Where is this going? Well, the simplest way of providing a suitable nesting area, as pre-avicultural man found for us, is to attach some brush to the sides of your aviary – under cover of course- in a convenient holder. Maybe a specially cut length of plumbers pipe with tapered ends for easy attachment or a cunningly crafted dog food tin will do the trick. So find out what vegetation your birds would encounter in the wild and model your brush around that. Failing access to various Melaleucas and Tea-trees then you could do far worse than cutting the humble Bracken Fern and placing these in your holders. A word for the young player here, cut your Bracken green then lay it flat and allow it to dry before placing it in your aviary as, if placed in green, it will look great for about 2-3 days before it wilts and looks decidedly ‘daggy’! Lay it flat and allow drying and it looks A-1 for the entire breeding season. When it gets a little ‘crusty’ just throw away the entire clump each year, what could be easier!
|
|
|
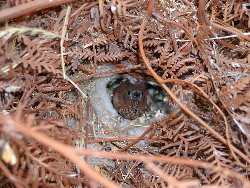
| Fig.1. Tea-tree in aviary. | Fig.2. Emblema amid the Bracken! |
Not into natural foliage, too far to go to get it, not allowed to, too much mess, wife won’t let you use the car or just can’t be bothered mucking about? Then let’s take a look at the sorts of man-made and natural nesting receptacles that are lurking about out there in several Australian aviaries. As mentioned in a previous article in Australian Birdkeeper on Mixed Aviaries there is a need to supply a wide variety of nesting sites for our finches so let’s take a look at as many designs as possible to create those essential microhabitats for our new aviary.
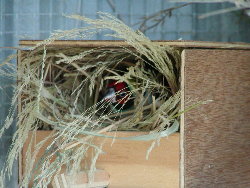
Wicker Baskets:
These are available for a modest sum from any Pet Shop Australia wide. They
come in a variety of shapes and sizes but I always opt for the largest types as
it is impossible to perform nest inspection on the smaller ones! For decorative
purposes the small ones are fine too I guess! We have bred Pytilias, Bloods,
Parrotfinches, Blue-caps and Orange Breasts to name but a few in these wicker
baskets. When these guys get a little ‘over loved’ it is easy to simply replace
them or, if you really have to, you can soak them in a bleach solution and
thoroughly dry them before using them again next season. However, most of these
are cheap for a reason – they ain’t built to last! Just a hint to save a nest or
two – never trust the wire prongs that hold the nest in place and it is better
to reinforce them than lose a nest because the wicker slats around the wire
broke! Yes, we speak from experience!
There are also cup-shaped wicker baskets lurking about that are favoured by many
of the Cardueline finch species.
|
|
|
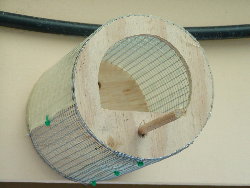
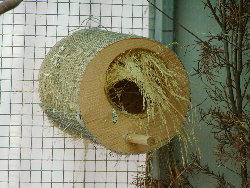
| Fig.3.Wicker Basket. | Fig.4. Mike Fidler nest box. |
|
|
|
| Fig.5. Brian's nest boxes. | Fig.6. Gouldians in box. |
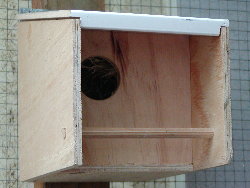
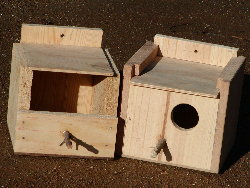
Nest Boxes:
The ubiquitous nest box comes in a thousand shapes and ‘models’ and I have
seen some that are rough sawn fence pailings up to those that were assembled
with the skill of a true carpenter! The standard type is what I call the classic
‘Budgie Box’. This is simply a square box with an opening hole drilled into it
and, on occasions, a piece of dowel stuck near the hole for the nesting birds to
perch on. For those keen on dimensions mine are 16cms long, 16cms wide and 12cms
high. I should point out that there is no rhyme or reason to those dimensions
but I have had a high level of breeding success in such boxes. If you wish to
try a variation on a theme forget drilling the hole in the front and simply
nail/screw a board half way up the front. In this manner the box is nowhere near
as dark as normal and I have seen Green Singers, Saffrons and Golden Song
Sparrows build and rear youngsters in such boxes. Nest boxes can be cleaned
following each breeding season and you will get years from a well constructed
one. If, like me, you have zero building skills just hammer a few ill sawn
planks together and surely one of your mates will take pity upon you and build
you some ‘proper’ ones – thanks Brian!!
One word of warning with your spivvy new nest boxes is to ensure that they have adequate airflow. Even a small nest of 2-3 chicks with their parents in attendance will generate an amount of heat and cause mildew and mould if you are not very careful – just the environment for Aspergillosis. Even in Tassy with its ‘temperate’ winter temperature these wooden nest boxes must have aeration holes drilled into the lid to allow some of that heat to escape. If we do it down here then I suspect you readers from the Big Northern Island would need to be even more zealous in aerating your boxes. All I have done is drill several holes in the lid and problem solved – mine ended up so wet inside that the lid was warped and wouldn’t open!
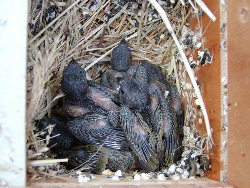
I have seen a number of ‘L-shaped’ boxes, which I was told, were designed for Gouldians. These have an entry hole which leads to a small platform separate from the nesting chamber. I believe the theory is that the adult birds would be able to better access the nesting chamber by ‘stepping down’ from the platform onto their chicks. I have seen such nest boxes also designed for Princess parrots. However, a mate recently told me that some Gouldians will take it upon themselves to fill the entire chamber with material up to the level of the platform thus somewhat defeating the purpose of the box! Anyway, they do look interesting!
|
|
|
| Fig.7. Songie nest in box - almost!! | Fig.8. Gouldian in open-front box. |
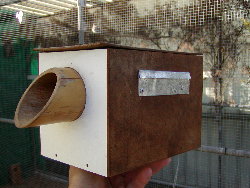
With the arrival of UK aviculturist Mike Fidler to our shores there was also some science applied to the humble old nest box. As you can see from (Figure4) the nest box has a small veranda attached to the front. This has a piece of dowel – or substitute for a short tree twig - for the breeding birds to sit upon and the solid veranda walls allow them some privacy. So far so good, but the science you ask? Well, the angle of the ‘perch’ and the siting of the dowel mean that any birds approaching the nest box must do so from below which means that they must assume a submissive posture, regardless of their ranking in the social hierarchy of the aviary. The sloped roof also prevents birds from approaching the nest box from above – nothing worse than some thoughtless bird tap dancing on the roof of your home! The aim of the box is to provide a safe and secure nest for all pairs in the aviary allowing not just the dominant pairs to breed. The theory behind the safety of the veranda is well documented from lovebird breeders that situate these ‘baffles’ along a dowel perch thus creating small microhabitats for their birds. So, instead of having 20 lovebirds squabbling over their space on the perch and racing up an down to ensure ‘rivals’ are ‘seen off’ they each have their own ‘compartment’ where they can be free from the sight of other inhabitants. Given the large numbers of this box type that are appearing in aviaries throughout Australia a lot of other finch breeders must find merit in Mike’s logic!
|
|
|
| Fig.9. Bamboo spout on box. | Fig.10. Pot-plant model! |
|
|
|
| Fig.11. Wire nest. | Fig.12. Wire nest with occupant! |
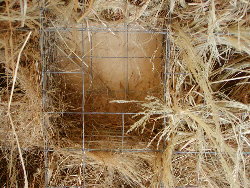
Wire Containers:
If nest boxes aren’t your thing then there are a number of wire baskets and
‘bunts’ that look pretty good and are very effective in providing nesting sites.
One that I stumbled upon in a number of Hunter Valley aviaries was a small
cylinder of 1/4inch bird wire with a wooden back and front where the front had a
large entry hole and a dowel perch. (Figure 11) These
look great and a host of finches will use them and one clever sole attached some
plastic over the top to prevent droppings from soiling the actual nest itself.
One bird that loves these cylinders are Diamond Sparrows but they try and cram
so much into them that there is little room for chicks to develop! Maybe keep
the Diamies away from them for their own good!
As I seem to spend most of my spare time wandering about the Hunter you shall
have to excuse me in that every second ‘device’ I come across hails from there –
given the amount of ‘convergent evolution’ that takes place in aviculture I mean
no offence if you adopted a similar innovation ‘years ago’! So it was with the
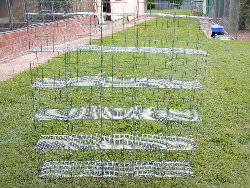
next wire container that I found to be excellent for a host of reasons. This is
what I affectionately call the "block of flats" nesting system. It is basically
a box-shaped structure of larger 2inch wire around 920cms high and 760cms long
with internal dividers that are roughly 155cms
wide. By adding a number of dividers you create a series of different levels
into which the birds can build. Some I have seen have vertical dividers as well
as horizontal ones which divides the ‘block’ into a series of individual units –
just depends how carried away you get. If you use 2inch wire for the front and
back you allow the birds plenty of access room and if you make your dividers out
of 1/2inch wire then the nest contents will not fall through the holes! When you
have constructed your unit you can simply stuff swamp grass and any other
desired nesting material into it and the birds will do the rest! In one of these
units, of the dimensions which I outlined earlier, I saw a pair of Red-faced
parrotfinches, a pair of African Fires, a pair of Orange-breasted waxbills and a
pair of Cordon Bleau’s all nesting at the same time and no, it was NOT the only
place in the aviary where they could nest – cheek! The dimensions of these units
can be altered to fit any spare space in your aviary and, unlike tea-tree and
brush; they sit flush with the walls and do not restrict flying space. Other
great points are that they are light and easy to remove and affix, they are
simple to clean out and basically last forever. Now all I have to do is find
somewhere in Tasmania that actually sells the right sized wire, a forlorn hope!
In the dim dark past before I fell under the spell of these ‘block of flats’
I used to construct large wire cylinders from 10cm square ‘pig wire’ that we
used to scavenge from the local tips - that is before such recycling was
officially frowned upon! A tip here is to only use the welded wire as the
twisted wire type is a death trap as far as finch legs are concerned! These
cylinders and squares, or ‘bunts’ as the old hands called them, could be made to
any shape and were filled with short lengths of Tea-tree and Bracken fern – care
must be taken not to pack the material in too tight lest the birds are unable to
get in too – as a rule of thumb the larger the spaces between your material the
better the finches like it! Worried about a load of finches sitting on top of
them and using the nests below as a toilet? Simple! Bend your wire to the shape
of a small plastic garbage bin and whack the garbo lid on top – Ok, isn’t
natural looking but is very effective as a ‘toilet pan’ and easy to clean!
The first of these ‘bunts’ that I saw were actually suspended from the roof of
the aviary and the finches were darting merrily between them. The owner’s logic
for suspending them in this manner was "so the mice couldn’t get into the birds
nests like they do when the bunts are attached to the wall!" Perhaps not the
best reason to have them like that but they were very effective and I use them
still and for those sniggering, no, I do not have a secondary rodent breeding
program either!
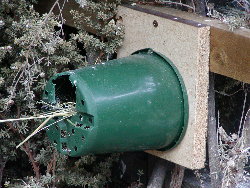
Take One Small Pot-plant Holder:
Many moons ago I remember using a heap of old pot-plants as nesting
containers and had forgotten about them until I recently saw them being used by
a Taswegian mate of mine! As if to further bear witness to the theory that there
is no such thing as an original idea in finch keeping he also stated he had seen
them on the mainland at Wagga Wagga being used to breed Blood finches. These are
very inexpensive and child’s play to construct. Simply take the desired sized
pot-plant – we like the 4-6inch varieties - and cut a finch sized entrance hole
in the bottom. Make a base plate to cover the open end of the pot and screw the
holder to it and mount on the wall. What could be easier? Use some intelligence
when selecting your pot and opt for sizes that suit the finches you have. As
these holders are made of plastic I suggest you mount them away from the hottest
parts of your aviary and, ideally, around 1.2 metres from the ground. From
bitter experience I have a strong distrust of anything plastic used to breed
birds in, but more of that later. The one draw back with these is that it is
hard to nest inspect unless you have a cordless drill! Hmm…maybe that isn’t such
a bad thing now is it!
As a variation on a theme you can get two pot plants of equal size and wire them
together then open up one end and you have a larger pot plant holder nest that
can be hung anywhere like a wicker basket and is easy to clean and wont fall
apart in a bleach solution!
The Ubiquitous Plastic Crate:
Now, in the dim dark past, before the introduction of many of the larger
shopping outlets, these plastic crates were known as "milk crates" and could
usually …eeerrr….’procured’ from public parks and/or waterways in the name of
‘cleaning up the environment’ – remember this is my story and I’m sticking to
it!! Now days one doesn’t have to risk prosecution to own them as every Big W
and K-Mart has them at throw out prices. We originally used them for stuffing
nesting material into but found that any of the parrotfinches appear drawn to
them to nest in. By attaching a piece of ½ or 1 inch bird wire inside them you
can create a number of levels which gives them more scope for nesting than the
grass and like just tossed in there and you can place small amounts of nesting
material in each level and your finches will do the rest. If your outlet only
has the solid sided types simply cut a number of openings with a jigsaw. Easy to
clean and will last you forever.
|
|
|
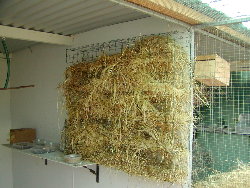
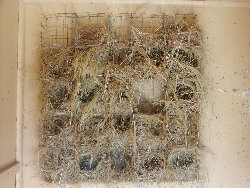
| Fig.13. 'Block of Flats' in action! | Fig.14. Full of nests. |
|
|
|
| Fig.15. Close up of single 'cell'. | Fig.16. Raw material! |
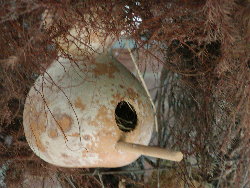
The Natural Choice –
The Gourd:
On one or other of my wanderings I saw Gourds being used as nesting
containers and one breeder in Gunnedah had Tri-coloured parrotfinches being
reared in them. These are freely available throughout warmer climes and it is a
simple matter of drilling the required sized hole and scooping out the pith and
seed from the inside. However, don’t let your location prevent you from growing
them as a mate grew several large gourds in a hot house in Hobart, Tasmania!
Since using these I have had a number of different species nest in them. As they
come in a variety of shapes they look great and will cater for any size of
finches. Mine originally came from Peppers Bird Products in Quirindi NSW and
came ready to be hung in the aviary. If you intend to ‘do it yourself’ I suspect
you had better check with your local Quarantine official, as I believe it is
illegal to import the fresh gourds into some states.
|
|
|
Fig.17. Good Gourd! |
The Hollow Log:
Nothing could look more natural than to supply small hollow logs for your
finches. Gouldians are especially keen to take advantage of them. I have found
that horizontal logs are preferred over vertical ones by any finches other than
Zebbies! The only problem is getting ones that are the right size for your
finches and it is possibly far easier to make a nest box exactly to your
preferred dimensions than scouring wood yards for logs. However, they do look
good, are relatively easy to clean and will last for your bird keeping ‘career’
if looked after. There is also a need to ensure that they are well cleaned as
mites and other nasties will find plenty of places to hide in a log and this is
a reason that many breeders prefer boxes. If logs are at a premium you can make
the most mundane looking nest box into a work of art by attaching a small
knothole to the front of the box. I first saw Hooded and Golden-shouldered
parrot breeders using such a system many moons ago and thought they looked great
and recently saw the same idea applied to finch nest boxes. The knothole allows
the finches to sit in the entrance hole in relative safety and provides an
excellent roosting spot too- maybe for similar reasons to the logic behind Mike
Fidler’s nest box?
Can’t seem to locate yourself a supply of knotholes? Never fear, because you can
achieve a similar result by getting a length of bamboo, cutting it into ‘porch’
sized pieces, completely hollowing out the insides and attaching it around the
hole of your nest box!
Having given you these ‘nest inducers’ it would be remiss of me not to mention a
few nesting sources that might give you more headaches than they are worth! Once
again, I can hear the rumblings of discontent as people mutter "hey, they work
for me!" Well, they didn’t for me so let the readers make up their own minds!
Plastic Nest Boxes & Milk Cartons:
I kid you not! Once upon a time you could buy plastic nest boxes from some
Pet outlets. These were great looking and easy to clean BUT they had a nasty
habit of generating so much heat even under modest summer conditions that the
occupants invariably suffocated or, in their attempts to stay cool, fell out of
the box onto the floor! I had some when I was a mere youth and, fortunately,
only tried them with Zebbies but it convinced me that I’d never present them to
Red-face parrotfinches. However, they were handy to use outside the aviaries as
mouse bait boxes until a brush cutting ‘incident’ ended their brief career!!
Then there was the guy that showed me his innovative use of plastic 2 litre milk
containers as nests, which could be hung anywhere. Unfortunately the result was
the same for the occupants, a few hours of heat and you could see the
condensation building up on the plastic to such an extent that the nesting
material was wet and if the heat didn’t kill the chicks then the fungus would!
Out into the plastic recycler where they belong! I am also aware that some
people experienced similar problems when using 1 and 2 litre cardboard
milk/fruit juice containers as nest boxes but have not used them personally.
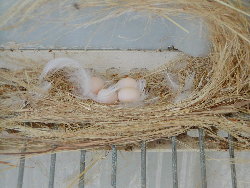
I hope that all this gives you a few new ideas of ways to provide some breeding space for your finches. Of course, don’t blame me if after adding a few of these ‘ideas’, your finches decide to nest behind the seed tray, on a ledge above the door or in the top of the seed bag you left sitting on the aviary floor! Also don’t be too annoyed when the Golden song sparrows construct a huge nest in your brand new nest box that you especially procured for your Longtailed grassfinches!
I once read on someone’s Honours Thesis something that went a little like this. Given the strictest of experimental design and conditions the animal will do as it damn well pleases!
|
|
|
| Fig.18. Pytilia nest behind seed hopper! | Fig.19. Emblema nest on window ledge! |
Such is the nature of the finch!